Showing posts with label black girls hair style. Show all posts
Wednesday, January 16, 2013

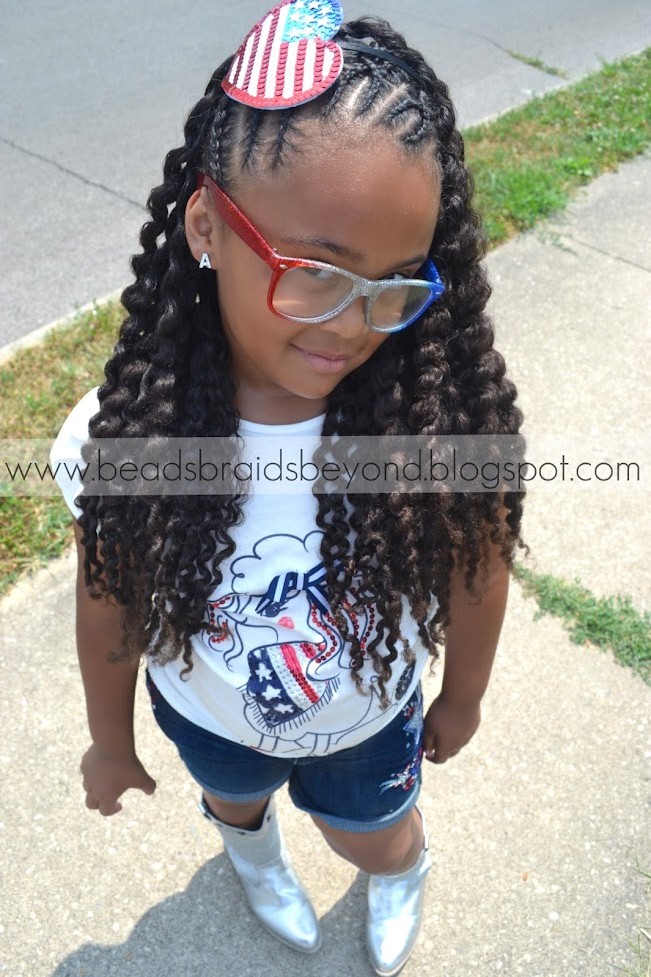
Little Girls Natural Hairstyle: Curled Cornrows & Afro Barbie Set by Miss Teeny Fab Couture Review!


First of all, how adorable is this afro puff barbie tshirt and bow set? Love it! It's by Miss Teeny Fab Couture but we'll get back to that in a moment.

Let's talk about this simple little girls natural hair style! 

Instructions:
  • Her hair hair was previously moisturized with Bee Mine Luscious Moisturizer and banded before styling. If you are not sure what banding is, it's a simple way to stretch the curls without the use of heat, check out this post for more info. I find working with stretched hair a lot more easier, you don't have to do it though. Totally up to you.
  • With a metal rat tail comb, I parted a large circle on the top of her hair leaving some hair out on each side and tied the back section off.
  • Working with just the parted circle section of hair, I began parting a section of hair to cornrow starting at the front of her forehead going all the way around the circle. Somewhat of a swirled effect.
  • I applied a little Bee Mine Curly butter to each section and proceeded to cornrow. I continued parting in that swirl effect within the circle until the top section was complete. If you do not know how to cornrow make sure you check out our cornrowing for beginners post
  • Once the top was complete I moved on to the back and simply parted front the front of her head down to the nape of her neck, added curly butter and cornrowed. At the end of each cornrow I added a flexi-rod about half way up the braid to curl them.
  • I left the flexi-rods in for about 30 minutes, once I took them out the braids were loosely curled.
That's it! Like I said, very simple if you know how to cornrow and totally adorable for a little girl. Especially with a super cute bow on the side! Feel free to accessorize however you like.

If you're interested in trying Bee Mine Products (our favorite!!!) don't forget we have a reader discount code! You can use code BBBSPRING for 10% off your purchase only at www.beemineproducts.com Happy Shopping!


On to the review... Miss Teeny Fab Couture generously sent Miss A this adorable shirt/bow set and we both fell in love with it! It's all very well made, even after washing the shirt still looks awesome. Miss A received so many compliments on it. I mean, it's not often that you see an afro barbie set! I love the 3d bow on the shirt, too cute for words!

Miss Teeny Fab Couture makes pretty much anything you want so make sure you stop by and "like" their facebook page! >>>HERE<<<


Sunday, November 11, 2012

Little Girls Natural Hair Style: Flat Twist Ponytails with Twisted Bangs & Rainbow Beads


By: Carrie Fay of Amaro Baby

With hair as amazing as Violet's, it's easy for me to get carried away with new styles.  Sometimes I lose track of the fact that my daughter is only 3 years old and does not (in my opinion) need to look any older thanks to the too-fancy styles that I can't seem to resist.  So it's refreshing when we find those styles that are simple enough for me to do, sturdy enough to last a week or two, and CUTE enough to make her look like the adorable 3 year old that she is.  

This is one of our "go to" styles:  Flat twist ponytail(s) with twisted bangs and rainbow beads.  


Flat twists have always worked better on Violet's hair than cornrows for keeping the fuzzies away, and some type of bangs just seem to suit her.  It adds a feminine touch and protects her hairline better.  Beads aren't something we normally do, but when we do them, it's usually a "color explosion" kind of thing.  (Once, my five year old son asked me, "Can we just put Violet's hair back the way God made it?  You know, with rainbow beads??")

We opted for heart snaps at the end of each twist this time.  Last time we did beads, we used rubber bands and saw a bit more breakage on the ends than I would like to see.  Snaps fall out occasionally, but I'd rather that than cause damaged hair.  


Anyway.  This is our style for the week.  The pigtails and colors suit her fun personality and her age.  And most importantly, Violet is a happy camper.  She loves her rainbow beads, skipping and jumping around the house to feel those pigtails swinging (and as a direct result, we can hear every. single. step she takes... another wonderful perk of a head full of beads!).  

Have a great week, everyone!  


Tuesday, July 10, 2012

Bantu Knot-out


I recently posted a picture of a gorgeous bantu knot-out done on shorter natural hair on our Facebook page.  I haven't done a full bantu knot-out on Miss A since she was about 4 years old and it didn't go very well but I felt inspired to try it again and although we had some issues this time as well I still love the look and she does too! 

Bantu Knot Instructions:

1. I began by working on freshly washed hair. For her full routine, click here.

 2. Using a wide tooth comb, I parted a medium to large size section by her forehead. I added a small amount of Bee Mine Luscious Moisturizer to her wet/damp hair then added a little Bee Mine Curly Butter from root to tip.

3. I began to twist the entire section to the right, all the way down to the ends.

4. Once the entire section was twisted, I started to twist the section into a circle near her scalp. Each time I twisted the section around, I tucked it under the previous one. I tucked her ends under the entire bantu-knot. Please be careful not to twist the section too tightly. I actually hold on to the knot and twist the entire bantu-knot the opposite way just to make sure it's not tugging on her scalp.

 5. There you have it! A bantu knot! Continue parting with a comb and twisting until you're done.

Bantu knots complete!

 The back view.

I gently removed the bantu knots after a few hours. Here's the end result of her bantu knot-out:


I like the results but it didn't come out as I expected. Next time I will work with dry, moisturized, stretched hair (from banding). You can see some of the parts in the back began to frizz up, this is because they were still wet. I will also use less product next time. I'm going to try another bantu-knot out on her within the next month to stay tuned!

Now it's YOUR turn! I'd love to see your bantu knot-out's! If you have pictures, feel free to post them on our Facebook wall. I'd love to see them!

Let me know what you all think of the new look. I changed a few things. Hopefully it's easier to find what you're looking for. I'm still working on it and I'm totally open to suggestions. Also let me know how you like the picture tutorial. Was it helpful or can you do without? 

 Don't forget to like us on Facebook!

Saturday, July 7, 2012

Criss-Cross Cornrows with Two Strand Twist Out


Hey everyone! I hope you all had a nice 4th of July. I decided to keep Miss A's 4th of July hair style fairly simple and go with criss-cross cornrows going half way back into two strand twists. Read below for more info on how this style was achieved. 

First, I washed, detangled, moisturized (with Bee Mine Luscious Moisturizer and Virgin Coconut Oil on top) then banded. You can read all about how I do that and what products I use by clicking here.

After Miss A's hair dried I removed all of the bands and parted her hair from ear to ear. I tied the back section off and began working on the top section. At an angle, I parted two straight sections and in those straight sections I parted 3 individual sections to begin the criss-cross cornrow. You can see how I criss-cross cornrow by clicking here. I used Bee Mine Curly Butter on each cornrow. 

I left the remaining hair loose at the end of each cornrow until I had 2 cornrows side-by-side then I applied a generous amount of Bee Mine Curly Butter to the remaining hair and twisted the two sections together.

After the top section was complete I moved on to the back. I parted large squares, applied some curly butter and twisted each section together. I rolled the ends of each twist between my fingers to make sure the twist did not unravel.

After a couple of hours of letting the two strand twists set I carefully unraveled each twist, starting from the end of the twist and working my way up and viola- A beautifully defined twist out! See pictures below.

Don't forget to "LIKE" us on Facebook!


Saturday, May 26, 2012

Flat Twists into Side Ponytail

click to enlarge

Just a quick 'do. Two strand flat twists going into side ponytail.

School is out in about a week so expect many more updates to come. :-)
Thursday, May 17, 2012

Box Braids for Girls + iheartcurls Review

By: Aisha of Braid With Me


The Style

Anisa has been sporting a new protective style lately... Box Braids!!! Box braids are one of my favorite protective styles because they are so versatile. You can wear them up or down, curly or straight. You can also style them or just let them be.  With the proper care and moisture, box braids can last for a very long time! 


I curled Anisa's box braids using Curlformers after a couple of days of having them in. Although her hair didn't curl the way that I hoped it would, I was still very pleased with the results. 


iheartcurls

I recently received these beautiful headbands and the gorgeous flower from Twisted Marie of iheartcurls. Iheartcurls offers fold over elastic headbands and hair ties that are both durable and affordable! The following description is available on her Etsy page:

This listing is for two FOE headbands with a silk flower and interchangeable snaps. These two bands are interchangeable the Velcro snap makes it easy to wear the flower on either band or wear it without the velcro snap. They are comfortable and can stretch easily while still maintaining their shape. Stretchy, soft material will not leave any dents or cause any headaches. Can be used to pull back hair without snagging or pulling too tight. Can be hand washed and laid flat to air dry. The ends are heat sealed to prevent fraying.


I received the Petals Package:

 Detachable flower with velcro attachment
 Fold over elastic headband with removable velcro attachment


The Review

Twisted Marie has created a wonderful product that does exactly what it claims. Anisa never complained about the headband being too tight. Nor did she have a problem with it slipping out of place. The orchid is absolutely beautiful! It never fell off and the velcro attachments did not pull or snag on her hair. 


I would definitely recommend these products!! They are durable, affordable, and oh so cute!! If you want to learn more about iheartcurls, head on over to her Etsy shop and let her know that I sent you!! 


Wednesday, April 11, 2012

How to Create Short Bangs on Long Natural Hair

Click photos to enlarge
 My daughter loves the look of bangs. I have a love/hate relationship with my own bangs. I cut them short, then I let them grow out and do it over and over and...well, you get the point. I always thought to myself, I would love to have them short one day and long the next. Well, I'm here to tell you that it is possible! After giving Miss A's little cousin twisted bangs several people asked me how they could achieve a similar look on long hair so I decided to try the same exact style but tweaked it a little. Read below for the simple instructions.

On stretched hair, I parted a square on the top middle section of her head. Using a metal rat tail comb, I parted a medium section within the square. I cornrowed that section straight down toward her forehead until I reached the end of the cornrow, I then began doing a basic two strand twist. I repeated this process 6 times. After I was finished with the top I did a simple bun. Since Miss A's hair is long enough, we no longer need the sock bun method. I simply placed her hair in a ponytail, gathered the hair, twisted it and wrapped it around the ponytail holder. I posted a picture tutorial on how I do this with her twists here, if you need more of a visual. After creating the bun I moved on to the fun part- bangs! I grabbed three twists in the front and turned them up toward the right side. I pinned them in place near the side of her bun and wrapped the remaining hair behind the bun. I did the same thing on the left side. To make the twists come together and look like real bangs, I pinned them together with a few bobby pins. I placed the bobby pin right at the end of the cornrows, through the twists. I added a headband and viola! You've got bangs! The headband added a bit of a retro look, if retro is what you're going for, try tying a scarf over the cornrows. 

She was thrilled to have bangs and said it was a big hit at school!

If you try this style, we would love to see pictures on our Facebook page. Join us! www.facebook.com/beadsbraidsandbeyond

Monday, April 2, 2012

Little Girls Natural Hairstyle: Cornrows & Twisted Bangs with Pigtails

Click pictures to enlarge
First of all, how adorable is she? This is another one of Miss A's cousins. We will call her Lil Bit. She saw  her sister get her hair done earlier in the day so she asked me if I could style her hair as well. How could I say no to this face? 

As always, I started off by washing her hair. I used Kinky Curly Come Clean Shampoo and Herbal Essences Hello Hydration conditioner (old ingredients). I applied moisturizer immediately after rinsing her hair (Bee Mine Luscious Moisturizer). After moisturizing, I began styling (on wet hair). First, I parted a square shape on the top, middle section of her head. I tied the rest of the hair back. This style is very simple and quick. I parted small sections coming straight down toward her face and cornrowed them, at the end of each cornrow I started doing a basic two strand twist. I used Bee Mine Curly Butter on each section. The plan was to give her some cute twisted bangs. After I finished up with the top, I parted the remaining hair straight down the middle and placed them in pigtails. I twisted the hair in the pigtails as well (4 twists in each ponytail) and added a couple of bows. I used Kinky Curly Curling Custard to slick the ponytails down and to smooth her edges down in the front.

Our reader discount code has been extended. BBBJAN will get you 10% off of Bee Mine Products. www.beemineproducts.com

Don't forget to like us on Facebook for more pictures! https://www.facebook.com/beadsbraidsandbeyond