Showing posts with label african american hair. Show all posts
Tuesday, September 17, 2013

Instagram Mail! Fishtail Braid


Miss A's hair was recently straightened. I did a quick fishtail braid before bed. Stay up to date on her hair happenings by following us on instagram- @beadsbraidsbeyond

Also, stop by and "like" our Facebook page!

Looking forward to seeing you there!


Sunday, November 11, 2012

Little Girls Natural Hair Style: Flat Twist Ponytails with Twisted Bangs & Rainbow Beads


By: Carrie Fay of Amaro Baby

With hair as amazing as Violet's, it's easy for me to get carried away with new styles.  Sometimes I lose track of the fact that my daughter is only 3 years old and does not (in my opinion) need to look any older thanks to the too-fancy styles that I can't seem to resist.  So it's refreshing when we find those styles that are simple enough for me to do, sturdy enough to last a week or two, and CUTE enough to make her look like the adorable 3 year old that she is.  

This is one of our "go to" styles:  Flat twist ponytail(s) with twisted bangs and rainbow beads.  


Flat twists have always worked better on Violet's hair than cornrows for keeping the fuzzies away, and some type of bangs just seem to suit her.  It adds a feminine touch and protects her hairline better.  Beads aren't something we normally do, but when we do them, it's usually a "color explosion" kind of thing.  (Once, my five year old son asked me, "Can we just put Violet's hair back the way God made it?  You know, with rainbow beads??")

We opted for heart snaps at the end of each twist this time.  Last time we did beads, we used rubber bands and saw a bit more breakage on the ends than I would like to see.  Snaps fall out occasionally, but I'd rather that than cause damaged hair.  


Anyway.  This is our style for the week.  The pigtails and colors suit her fun personality and her age.  And most importantly, Violet is a happy camper.  She loves her rainbow beads, skipping and jumping around the house to feel those pigtails swinging (and as a direct result, we can hear every. single. step she takes... another wonderful perk of a head full of beads!).  

Have a great week, everyone!  


Monday, November 5, 2012

Top 10 Most Popular Natural Hair Styles for Little Girls


Braids, twists, cornrows, twist outs, beads, oh my! I know how overwhelming it is looking for natural hair styles for little girls on our blog with hundreds of styles to choose from. I'm here to share with you the top 10 most viewed (on Beads, Braids & Beyond) natural hair styles for our curly and kinky haired gals!

Number 1 - Natural Hair Styles for Little Girls: Cornrows & Twist Out - Flat Twists & Twist Out
I guess it's no surprise that a simple but pretty hair style like this one is number one at 44k+ views. This style is very easy as long as you know how to cornrow. Basic cornrows with a twist out topped off with some cute bows from Gymboree and your little lady is good to go! Read more...


With 28k+ views and counting this post showcasing three completely different little girls hair types comes in a strong second. Cornrows, twist outs, puffs, what's not to love here? Read more...


Over 21k+ views! As you can see, cornrows and twist outs are very popular for African American and biracial little girls. I'll echo what I said for number 1, this style is very simple as long as you know how to cornrow. The cornrow pattern is slightly different here but nothing too intricate. Read more...


One of my personal favorite hair styles for my little girl! Coming in fourth at 20k+ views. Inspired by singer and actress  Jill Scott and the beautiful Tiashauntee of Her Best Hair. Not only is this style cute, but it stays put for up to two weeks if cared for properly. We love protective styles for little girls as long as they are not done too tightly. Read more...


Ah, yes. Back to the basics. Over 18k+ views, natural box braids comes in at number 5! What little girl doesn't love to swing her braids? Not a care in the world. Dress the braids up with beads or barrettes or keep it simple with bows or a headband. Curl the braids. Put the braids in ponytails. The possibilities are endless! The best part? They can last 4+ weeks with proper care! Happy mommy and child! Read more...


Stop by later this week to see the remaining styles in our Top 10 Most Popular Natural Hair Styles for Little Girls series and see if your favorite style made the cut!

Of course these are just the top 10 most viewed styles on our blog so these may not be your top 10 hair styles for natural little girls. 

I'm curious to know; did your favorite hair style make the list? If so, which one? If not, what is your favorite natural hair style for your little girl? Better yet, feel free to share pictures of your favorite style on our new Facebook page, Beads, Braids & Beyond. I look forward to seeing you all there!

Thursday, November 1, 2012

Introducing New Guest Blogger: Carrie Fay


By: Carrie Fay of Amaro Baby

I never in a million years thought that "cornrow" would be a regular part of my vocabulary.  Seriously.  Let alone flat twist... beads... bantu knots or the hundreds of other words that float around our house.  

But then Violet joined our family and my world was turned upside down in a thousand perfect ways, not the least of which is caring for her amazing hair.     


With practically no hair on her head the day she turned 11 months (also they day we met!) she and I have learned this process together, step by step.  Slowly, steadily, and to both of our great delights.  Now we eagerly anticipate hair days.  We collaborate on styles, colors, and the movies to include in our movie marathons.  (Hair days are fun for lots of reasons, people!)   


I get a little too excited talking about hair, can you tell?  So excited that I forget to write about what I'm SUPPOSED to write about:  A little about myself.  I am a proud mama to Violet (3 years old) and Daniel (5 years old).  I am a wife to the most ridiculously amazing husband out there.  I have experienced motherhood through adoption and through pregnancy.  I am a photographer and am relentless in my attempts to stop time (or at least slow it down!) through photography.  I am totally in love with Jesus.  Also, ice-cream.  I am a part of a family where no one matches - four skin tones, four hair types, four different stories - and we love it.  I began homeschooling our two kiddos a few months ago and am daily floored by the experience - it's beyond my wildest expectations.   


I am beyond thrilled to guest post on one of my all time favorite hair blogs.  Violet and I owe so much to the online community of natural hair care supporters/educators and it's my hope that I can encourage the mamas out there who are just starting out, just reaching out for information about natural hair.  You CAN do this!  One cornrow at a time.  


Now, if you'll excuse me.  Hair day is tomorrow and Miss Violet is in the next room, trying to decide on bead colors for her yarn twists.  It might not be the most important decision we'll make all week, but I wouldn't miss it for the world.  

New Blog:  In the works!
Old (Outdated!) Blog:  www.amarobaby.blogspot.com 
Wednesday, October 17, 2012

Beads, Braids & Beyond FACEBOOK! What happened?!

I'm sure many of you are wondering what happened to Beads, Braids and Beyond's Facebook page, truth is, I don't know! Apparently Facebook deleted it. SIGH. Please go like and share the new page, thank you!

https://www.facebook.com/BeadsBraidsBeyond
Saturday, September 1, 2012

Reader Mail! "Just an appreciation for your website"

Crystal's girls
I just received this email from a reader, Crystal. I absolutely love it and had to share. Her girls are complete dolls! :)

I love hearing from you all! If you would like to share something email me at beadsbraidsbeyond@yahoo.com

-Nikki

Hi my name is Crystal, I have two daughters (6&8) both with natural hair. I do not know their type but to me it's a headache. In the pictures I sent, you can see the various styles I try on their heads n this is just a few. Every summer I give them braids w/beads because it's easier and less maintenance and they r on a swim team so its easier for the pool. During the school year it's mainly ponytails ranging from 1-20. I do their hair every morning. I have been searching for the right hair products since their age of 2. Looking for the right grease that does not dry out the hair, shampoo that does not leave the hair in a tangled mess, and the right kind of moisturizer that will keep their natural curls for the day at least. 
I am soooo happy that I found your website that can guide me in the right direction for not only my girls hair but mine too. (Now I can stop asking people on the street 20 questions about their hair) :-) Thank you so much for your concerns for others and their hair. 
-Crystal


Tuesday, July 10, 2012

Bantu Knot-out


I recently posted a picture of a gorgeous bantu knot-out done on shorter natural hair on our Facebook page.  I haven't done a full bantu knot-out on Miss A since she was about 4 years old and it didn't go very well but I felt inspired to try it again and although we had some issues this time as well I still love the look and she does too! 

Bantu Knot Instructions:

1. I began by working on freshly washed hair. For her full routine, click here.

 2. Using a wide tooth comb, I parted a medium to large size section by her forehead. I added a small amount of Bee Mine Luscious Moisturizer to her wet/damp hair then added a little Bee Mine Curly Butter from root to tip.

3. I began to twist the entire section to the right, all the way down to the ends.

4. Once the entire section was twisted, I started to twist the section into a circle near her scalp. Each time I twisted the section around, I tucked it under the previous one. I tucked her ends under the entire bantu-knot. Please be careful not to twist the section too tightly. I actually hold on to the knot and twist the entire bantu-knot the opposite way just to make sure it's not tugging on her scalp.

 5. There you have it! A bantu knot! Continue parting with a comb and twisting until you're done.

Bantu knots complete!

 The back view.

I gently removed the bantu knots after a few hours. Here's the end result of her bantu knot-out:


I like the results but it didn't come out as I expected. Next time I will work with dry, moisturized, stretched hair (from banding). You can see some of the parts in the back began to frizz up, this is because they were still wet. I will also use less product next time. I'm going to try another bantu-knot out on her within the next month to stay tuned!

Now it's YOUR turn! I'd love to see your bantu knot-out's! If you have pictures, feel free to post them on our Facebook wall. I'd love to see them!

Let me know what you all think of the new look. I changed a few things. Hopefully it's easier to find what you're looking for. I'm still working on it and I'm totally open to suggestions. Also let me know how you like the picture tutorial. Was it helpful or can you do without? 

 Don't forget to like us on Facebook!

Monday, July 9, 2012

Big Carefree Natural Curls


I received several questions on our Facebook page about how I got Miss A's curls to look like this and how she was able to achieve her second day hair so I thought I would make a quick post explaining how we achieved her big carefree curls.

After washing and detangling her hair, I applied a generous amount of Bee Mine Luscious Moisturizer through her wet/damp curls with my fingers, from root to tip. I did not brush the product through. I continued to rake the product through (raking is key!) until I felt it had been evenly distributed. 

Once her hair dried it looked like this:

Later that night I gathered her hair in a loose ponytail on top of her head and created a messy bun, tucking the ends under. It's important for her to not sleep with her curls out. Once she lays on them they will tangle up terribly and become matted pretty quickly. When we want second day hair I will either place it in a high bun or put a few loose braids in her hair. 

The next day I removed the bun and her curls looked like this (see picture below). The only change I made was pinning the middle section of hair back for a different look.


Please note that if you try this (just using a moisturizer and raking) the curls will not be perfect. There will be frizz. Embrace it and learn to love it! As you can see, it's a beautiful thing.

Don't forget to "like" us on Facebook!


Wednesday, June 27, 2012

Miss A's Updated Natural Hair Care Routine

*Miss A's Hair Care Routine          
I have been getting a lot of questions about Miss A's current hair care routine and how her hair has retained so much length since starting the blog back in 2009 so I thought I would do an updated hair care routine post for you all. It has been such a long journey and so much trial and error and I believe I finally know what works for my daughters hair (and my budget!) I hope you find this information helpful!

*Washing & Detangling                  
I shampoo A's hair and scalp once a week. I cowash after each swim during the Summer months. I apply small amount of shampoo to the tips of my fingers (about the size of a quarter) and gently massage her scalp, working my way over her hair. I'm not too picky when it comes to shampoo, as long as it's sulfate free. Below is a small list of shampoos I've used.
    Now the most important step when it comes to Miss A's curls, detangling! After rinsing the shampoo I apply a very generous amount of conditioner on soaking wet hair. If her hair is not dripping wet I run the handheld shower head over her hair and immediately apply the conditioner because her hair soaks up the water. I like to use a cheap drug store conditioner since I use so much and it's only going to be rinsed out anyway. I look for a creamy conditioner with a lot of slip. I've been using V05 conditioner lately and I must say, it gets the job done! See below for pictures and more info on how I detangle my daughters hair.

    Here is Miss A's hair completely wet and loaded up with V05 conditioner. As you can see it's very tangled!

    The first step to detangling is to finger detangle! Never skip this step! I smooth my fingers over sections of her hair, if they feel "lumpy" I will focus on that section and gently pull apart the strands of hair. If the strands of hair (or knots/tangles) are not coming apart easily I will rewet the section, add some more conditioner, and gently try to work my way through it. I do not snap the hair apart, which causes unnecessary breakage.

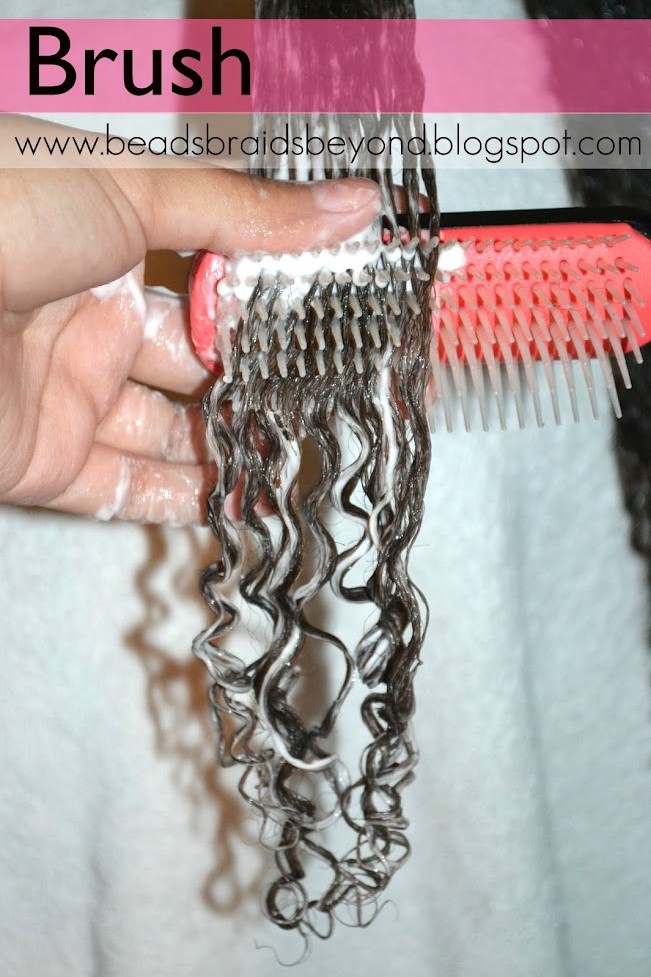
    After finger detangling I use a Denman brush starting at the ends and slowly working my way up just to be sure the section is completely detangled. 

    This section is all detangled! You can see the difference between the detangled section and the section in the back.

    After detangled each 2-3 inch section I do a large twist so the hair does not tangle back up as I'm detangled the rest.

    Once Miss A's hair is completely detangled I leave the twists in and rinse the conditioner out.

    After washing Miss A's hair I get her dressed and remove each twist/braid, one at a time, and apply a generous amount of Bee Mine Luscious Moisturizer to each section from root to tip on wet/damp hair. 

    After applying Bee Mine Luscious Moisturizer to each section I will either twist, braid or band each section to stretch it out for styling the next day unless I plan on letting her wear her curls out.

    Braided or banded after moisturizing: (old pics)

    Still not sure what banding is? Check out our Banding F.A.Q. post!

    If I want Miss A to wear her natural curls out I will apply either Kinky Curly Curling Custard or Bee Mine Luscious Moisturizer to her wet hair. I rake the product through with my fingers, no losing brushing through. I  personally think the curls look better using the raking method. Be on the look out for a post better explaining it!

    Interested in Bee Mine Products? We still have a reader discount code, good for 10% off your purchase! See below for details and click the image to take you to their website.


    Use code: FALLBBB for 10% off your Bee Mine Products purchase!

    *Styling                                               
    How often? How long do styles last? How to care for styles while they are in? Products used? etc.

    I believe protective styling is one of the reasons Miss A has retained so much length over the years. I really prefer for her hair to stay in protective styles but with everything going on (Miss A's epilepsy, Lil Man autism, my weight loss journey- NikGetsFit, etc) it's been tough getting back into a styling routine.

    I like for Miss A's hair to be styled at least 2 or 3 weeks of each month. The longer the style lasts, the better.

    How long do styles last?

    • Updos - Usually no more than 1 week.
    • Cornrows - Between 1 and 3 weeks, depending on the style.
    • Twists - If they are large, no more than 1 week. If they are small, they can last up to 4 weeks if cared for properly.
    • Single/box braids - Between 2 and 6 weeks, depending on the size.
    What is protective styling?
    Protective styling simply means styling the hair to protect it from everyday elements. Whether it's being handled too often, combed too much, rubbing against clothes, etc. All of this can lead to breakage. 

    A few examples of protective styles:
    Two Strand Twists with Braided Roots Pulled into High Bun 
    Click here for more information and pictures
    Small Cornrows into Large Cornrows
    Click here for more information and pictures
    Side Swept Two Strand Twists into Side Bun
    Click here for more information and pictures
    Look in the right side bar under find posts and click "protective styles" for more examples of use the search bar. You can also check out our Style Gallery on Facebook.

    Caring for hair while styles are in:
    If Miss A is wearing a hair style that will be in for a while (such as mini braids), I continue with our regular washing routine. I will shampoo her scalp once a week and apply conditioner, letting it sit for a few minutes before rinsing. Afterwards I will moisturize, focusing on her edges, nape and ends.

    Products used for styling:
    I almost always use Bee Mine Curly Butter when styling Miss A's hair in braids, twists and cornrows. When styling hair for twist outs or braid outs I use whatever I have on hand whether it be Bee Mine Curly Butter or Curls Whipped Cream. See below for a complete list of products.

    What about rubberbands?
    When styling A's hair, I try not to use styles that require rubberbands or anything at the base of ends to avoid breakage. I can't always avoid rubberbands though so when we do decide to use them I dip them in Extra Virgin Coconut oil and make sure the area I am applying the rubberband is extra moisturize. When using rubberbands I'm careful not to wrap them too tightly. I avoid keeping rubberbands or ponytail holders in her hair for a long period of time. I don't feel comfortable leaving rubberbands or ponytail holders in her hair more than a few days, sometimes I will go up to a week but that's rare. When I use ponytail holders I only use Goody Ouchless Cloth covered ones without metal.

    still adding more info.

    *Curl Definition                                
    Miss A has been wearing her curls out a lot lately and I have been getting so many questions about what products I use and how I get her curls so defined so I'll just give you our basic routine when I'm styling her curls.

    I have finally found out the secret to beautiful curl definition- RAKING the product through with your fingers into of brushing/combing! Pretty simple, right?

    First I have to figure out what look we're going for that day, very defined elongated curls or big fluffy careless curls?

    For defined elongated curls: Immediately after washing and detangling Miss A's hair I apply a very generous amount of Kinky Curly Curling Custard to a 2-3 inch section of her hair. I make sure her hair is soaking wet. If her hair is not soaking wet I spray it with the handheld shower head. I run the product through the section of hair with my fingers. I make sure every curl is completely coated with KCCC. I continue this process until I am done. Her hair takes a long time to dry with the Kinky Curly Curling Custard in her hair so I get her dressed and keep a towel on her shoulders for a while. Once her hair is dry (or almost dry) it looks like this:


    For big fluffy care free curls: On wet/damp hair I apply a generous amount of Bee Mine Luscious Moisturizer and run my fingers all through Miss A's completely detangled hair. I rake the moisturizer through with my fingers, fluff a little and leave it until it dries. It doesn't take very long. Afterwards her curls look like this:


    will add more soon
    *Products                                           
    Here is a list of products I like. There will be a star * next to the ones I must have available.

    Shampoo:
    Note: I'm not too picky when it comes to shampoo. As long as it's sulfate free and doesn't strip her hair then it's fine by me! 

    Conditioner:

    Note: Since I use so much conditioner, I really prefer to go the cheaper route. I love some of the pricier conditioners but in the end it doesn't make sense to my budget so I splurge when I feel like it but stick to the basics most of the time.

    Deep Conditioner:
    Styling Aides for Curl Definition:
    Styling Aides for Hair Styles (braids, twists, twist outs, etc):
    Moisturizer:

    *Summer Hair Care                      
    Summer is not kind to Miss A's hair. Between the chlorine and the sand at the beach, we're almost asking for a disaster! Don't let the picture fool you, she rarely wears her hair out when we hit the water.

    Swimming Routine:

    • Rinse hair with water and apply a light leave-in or whatever conditioner I have on hand. Coat the strands of hair with the conditioner and leave it in. Apply extra virgin coconut or olive oil on top of the conditioner (optional).
    • Put the hair up into a high ponytail or bun with ends tucked under.
    • Braids & Cornrows hold up very well for Miss A in the water so try to incorporate those during most of the Summer months.
    • Cowash (washing the hair with conditioner only) after each swim. Leave the conditioner in for at least 10 minutes before rinsing. Continue shampooing once a week unless I feel it is necessary to shampoo more often.
    • Apply Bee Mine Luscious Moisturizer to hair. Focus on ends, nape and edges. Seal with Extra Virgin Coconut or Olive Oil.
    If sand is involved I will have her wear a loose style and completely wash (shampoo, condition, detangle) her hair once we get home. We went to the beach in Texas and her hair was in a protective style (cornrows on top, large two strand twists in the back) and the sand got all up in her twists. I don't like two strand twists at all for the water anyway, they tangle too easily.

    We don't use swim caps. No real reason or explanation, we just don't.

    Don't forget to apply sunscreen to your child's scalp if they are wearing a style that shows a lot of their scalp such as cornrows. Just apply a little sunscreen to the q-tip and apply directly to the scalp in each part. We don't want our babies to have a sunburned scalp! No bueno.


    Will be adding a little more information soon! Thanks for stopping by!

    Don't forget to "LIKE" us on Facebook!

    *Pictures                                           
    More hair pictures:

    Curls with Bee Mine Luscious Moisturizer


    STILL UPDATING. Please continue to check back! Thanks!