Showing posts with label twists. Show all posts
Thursday, April 3, 2014

Today's Hair - 4/3

This is me pretty much in real time...


My hair is in two wet flat-twists right now. I washed and conditioned my hair, oiled it, use various leave-ins and am trying Karen's Body Beautiful as my sealant. But I'm trying to decide what to do next. 

Should I let my hair dry like this and do a big twist-out for tomorrow, or think of this as a style to stretch my hair, and twist it tonight? I can't decide - but I will keep you posted.
Tuesday, April 1, 2014

My Hair Last Week - Somewhat Inspired

So I posted this pic early last week and called it hair inspiration:


I was inspired. Not to try the exact style because I knew that I wouldn't wear it out, so I made modifications. I actually pulled out my rollers twice over the past week. The first iteration included me putting my hair in a ponytail then rolling the ends for an imagined curly bun. It turned into a 70's bouffant/prom hair, but I liked it. I allowed the drop curls to be kind of stacked into my bun. Here are some photos:


Again, not photogenic, but you get the idea. 

Later I disturbed the curls a little and despite sweating it out I wore it like this:


I then decided to roll it all, although I used far fewer rollers than Ms. Dugas. I put it up in another bun. Here are the photos:


After the rollers, I had one more wave of inspiration - actually I just knew it was going to be another couple of bun days, so I changed it up a little by twisting all of the my ends into 5 large double-strand twists. I tucked them under and pinned them down. Here were the results:


The next day I undid the twists, pinned down the hair a little and did a little flat-twist bang.


Let me know what you think, and please forgive me for these photos. I'm going to start setting up my "real" camera, so I can put up decent photos on this blog....and if you would like to find a collection of easy (and cute) hairstyles, find my book, One Hairstyle, Thirty-one Ways, on Amazon.com. 

Sunday, March 2, 2014

My Hair Today - 3/1, Thy Name is Failure

First let me kick myself for not taking pictures of my twistout from this morning. It was chunky, shiny, bouncy and full. I used a mixture of olive and coconut oil and a layer of Karen Body Beautiful's Coco Lime Sweet Ambrosia Leave-in Conditioner (I love the smell, the consistency, and it's effect on my hair, but I don't love the price) to gently finger detangle my hair after a week of what can only be described as wash-n-go puffs. I then formed 8 big twists from the resulting Afro and went to sleep.

In the morning I split the twists and went out for breakfast. Lots of compliments. I felt good, my hair felt good. I had pancakes and someone else paid for them. All was right with the world. 

How I felt...

The problem was that I then went to my boxing class without twisting, pinning or covering up my 'do. I worked hard, I jabbed, I shadow boxed, I ran, I learned a new boxing combo, I ran some more and finally after some ab work, I was done. And so was my hair. It had no style nor definition by the end. It had bounced, then expanded, then frizzed and finally gave up the ghost of any hairstyle. I ended up doing two flat twists and keeping it moving. 

How I ended up...

Has this ever happened to you?
Tuesday, January 7, 2014

The great mini- twist debate!

Maybe I'm the only one debating...but if I'm alone it might be better defined as a rant. Oh well. Anyway I've been wearing my hair in twists for years. I love them. And I love sitting them in a bunch of different ways (plug for my book), but I don't love people taking hours upon hours or days to do "mini-twists". Just because you plan to plan to wear your twists for a couple of weeks and/or style your twists, it doesn't mean that they have to be tiny and it doesn't mean that they have to take days to do.  In fact, you can style twists of a variety of sizes. 

I'm not telling you that mini-twists aren't pretty, or that you shouldn't do them. Do you! I'm just saying that for all the people that don't twist your hair because you don't want to spend 6 - 12 hours or twist your hair over 2 or 3 days, your twists can be twice the size and you can still style them! And you can still keep them in for 3 - 5 weeks. I promise. I know because I do it...or maybe I should say I never do it. I generally spend 3.5 to 4.5 hours twisting my hair (and that's with using 3 to 5 products on each twist). And I keep them in for weeks at a time.  

Here is the size I prefer:


Medium sized twists, about the size of a #2 pencil. They are small enough to style, and still have enough volume that I can wear them out. Every style in the book was done on twists of that size. 

A couple of weeks ago I went back to styling my hair in twists after months of wearing it loose. I made my twists a little larger than I had been in the past, but I was still able to curl them and style them.


I forgot to take any pictures after I finished! I may add a photo from Christmas, where I used rollers on all of my hair...

But in preparation for a trip and after 3-4 weeks of twists, I decided to re-twist my hair. In fact styling my hair has spawned an idea that I'm going to test out when I get back...

But the point is, I was still able to style my twists without taking much time to do them.

I was just going to refresh my twists but I redid them instead, and made them a little smaller. It took 8 hours to take them out and re-do them section by section...but I don't think that was a ridiculous amount of time to spend, given the circumstances. In any event here is a comparison of the two sizes (December vs. January) in the same style.


As you can see - they are smaller, but I don't think they are better. But maybe I just don't know - why do you make true mini-twists? Is it worth the time? What is the advantage of having them be this size?


Photo via particurlynatural.com. They are pretty...but I don't want to spend the time...


Unknown maintenance, twists
Tuesday, November 19, 2013

Hair for Today - New Day, New 'do!

I did something new today (well actually it started on Sunday, and I finally did what I planned to do, today)...I've been seeing directional flat twists with rollers that have ended up as really cute, curly, fluffy loose hair, and I figured that I would try it and see how it turned out.

So here it is as I intended...sorta:


The steps were as follows:

1. Working with wet hair (I washed it, and my hair was already detangled and in 4 large twists), coat hair with products of choice. I used the entire Oyen line, and I will write a review about it by tomorrow.

2. Separate hair into sections to flat-twist. Since my hair was already in the large twists, I decided that I would do 3 flat-twists per section, and end up with 12 flat-twists. I did not use a comb during this process, and instead used my fingers to separate each twist into 3 flat-twists. 

3. Twist each each flat twist into the direction of your intended style, if you want the sides to go forward, twist in that direction. I usually flat-twist all of my hair toward the nape of my neck, so this was a change for me.

4. Double-strand or two-strand twist the ends of each flat-twist.

5. Roll the ends. I used flexible rollers. - I started this style on Sunday, but I didn't like the way my ends came out on Monday (the hair was only rolled for about 4 hours), so I didn't wear the style. This morning I dampened my ends, and sat under my dryer for about 40 minutes.

6. When hair is dry, undo the rollers, and with oiled hands, gently separate the twists from the ends to the roots.

You should end up with a fluffy, curly twist-out.

=========================================

Next time I will make fewer flat-twists. Maybe 8 instead of 12. I will also turn the ends into two separate double-strand or two-strand twists. If I did 8 flat-twists, I would end up with 16 twists to roll with rollers. For me, the flat twists were too small, so I ended up with crinkles instead of the spiral curls that I usually get with flat-twists. I also had too much hair in each double-strand twist, and I think that it prevented my hair from curling as much as it should have. Don't get me wrong, I like it, but it didn't turn out how I imagined.

=========================================
AND this is how I styled my hair on Sunday, after I twisted my hair, but before I could dry and curl it.


I did kind of a milkmaid thing, where I linked all of the ends
together around my head, then I pinned up a bun in the back.
I received some unexpected compliments. And please excuse
my expression - I was late, and mad that my hair wasn't done.

This is how I wore my hair yesterday....


So this is how I wore my hair yesterday. I tried to cover up the
parts from the flat-twists by pulling the top back, and pinning it over the sections.
I had no expectations - so I was very pleased.

Tuesday, November 12, 2013

It's Those Smiths Again - Curls on the Street!

Although I could have sworn that I posted this last night, I guess I didn't! Trey Smith, Will Smith's oldest son, turned 21 and celebrated with his Dad, Step-mom and siblings in Las Vegas.

They started off with a family dinner, then Trey and Will made their way into the nightclub and rang in his actual birthday with Trey playing DJ at the midnight hour...

But now on to the important stuff - did you check out everyone's hair?


I love the new braids Jada! Jaden, who did your twists? And Trey is displaying his Curls on the Street!


Father & Son

Wednesday, November 6, 2013

Hair Inspiration - Updated 11/12!


I saw this style on Instagram via @missbeespeaks, and I fell in love! It's a double protective style, twists (flat-twists) and an updo....That is my favore combo! Anyway, I'm going to try this tonight and give you an update tomorrow. I see that it will require me to pull out a comb and mirrors, but I feel up to the challenge.

Do you love this as much as I do? 

======================

So it's been a few days but I did try the hair inspiration. Or at least a variation on the hair inspiration that worked for me and my time constraints that day. I attended the Learn and Luv Your Hair event sponsored by Carol's Daughter and featuring Taren Guy. It started at 6, but I didn't start my hair until after 5:30, I had to do what I could, as fast as I could. So 45 minutes later I finished my hair, and I was finally out of the house by 6:40...Anyway here are the steps as I imagine them, and I will also let you know what I did differently.

Tools: Detangler (Large toothed comb), bobby pins, sharp comb for parts, 2 ponytail holders.

Products: I used Alikay's Lemongrass spray and Dulce curling cream, Eden Bodywork's Coconut Shea Leave-in, and oil 

Time: My version took about 45 minutes, but I think that the full version would add about 20 minutes - especially if you did more flattwists and less doublestrands in the front.

Steps:

1. Gently detangle hair. I did a post yesterday about how I need to change my approach because I was NOT gentle with my hair.

2. Part you hair from left to right, just past your ears.

3. Put the back section into a ponytail. This is only temporary if you plan to flat-twist the back.

4. Separate the front section by making an angled part, either at the right or left temple (you decide).

5. Put one section of hair into a ponytail holder or clip, temporarily.

6. Take the other section begin forming flattwists. In my version there were only 4, but the inspirational style has 6. Double-strand twist the ends of the hair. When you have completed the flat twists, take the ends and twirl them together toward the crown of the head, and forming a single twist. Pin the now single twist at the crown, in preparation for either adding it to the ponytail or incorporating the ends into a bun formed from the other flat twists. 


I didn't love my little swirl, but overall, I loved the style.

 
7. On the other large section of hair in the front, separate the hair into sections to form doublestrand twists. In the inspirational style, it looks as if the first column or two of twists began as flat twists for the first 1-2 inches, and then were double-strand twisted to the ends. I believe that the rest of the front was done in doublestrand twists. In my version, I double-strand twisted the entire front section. I ended up with about 17 of them. 

8. Take the ends from the front section and form a finger-roll as a single unit. Turn the unit to the side, so that it forms a swirl or a loop, and pin it down as needed, preferably right above the ear. 

9. The inspirational style resulted in approximately 8 flat twists going up the back of the head toward the crown, with the ends being formed into doublestrand twists. All of the ends at the crown were then used to form a loose bun, and pinned in place. My version added the ends of the flat twists into the ponytail, and formed twists with the rest of the hair. I then formed a bun with the twists. I then decided that I had too many twists in the front of my head, so I took about a third of the twists from the front of my hair and Incorporated them into the bun formed from the pony tailed twists. 

I liked the outcome - and I even received some compliments, and some commentary from Trudy, 4CHairChick, at the Learn & Luv Your Hair event on Sunday. She said that she thought it looked more professional without the flat twists in the back. I loved them though, and if I ever feel like taking the time, I am going to try it.      
Thursday, October 31, 2013

Today's Hair - October 31st

Bathroom selfie #1
So I woke up this morning and felt terrible that I had let my hair sit in my bun for most of the week. I figured it was in need of moisture, care, and detangling, and I was correct on all counts. I decided that I needed to give it a little TLC ASAP.

1. I separated my hair into about 12 twists by using Alikay Naturals Lemongrass Leave-in Conditioner, Eden Bodyworks Coconut Shea Leave-in Conditioner, Alikay Naturals Dulce Hydrating Curl Lotion, and Shea Moisture's Curl Enhancing Smoothie...I know I always use a lot of products when I twist. I know.

2. I left one twist out to serve as a bank - or a distraction (however you want to look at it).

3.I took the two front middle twists and twisted them at the root once or twice before crossing them.  I pinned them down where they crossed. I left a couple of twists loose - one right over my right ear, and one at the left side of my temple. I then crossed the next set of twists, and pinned those down where they crossed. I then took the twist from my left temple, and pulled it straight back and pinned it down. For the twist over my right ear, I formed a circle and pinned it down. 

4. I left one twist on the right side loose, but put the hanging ends from the top section, and the loose twists from the back of my head into a looped ponytail (I did not pull the ends through and instead left them inside the ponytail). I pinned the loop to my scalp, took the one loose twist from the right side and used it to cover the ponytail holder.

All said it only took about 3 minutes to do (after creating the twists). And it was a pretty easy way to take my desperation 'do and turn it into something decent-looking.  

Bathroom selfie #2
Wednesday, September 25, 2013

(Updated) Today's Hair - September 25th

When I twisted my hair on Sunday, I did not plan to do a twist out. I just wanted to clip my ends and leave my hair alone for a week or two. But when I started getting ready to go out on Monday night, I couldn't figure out what to do with my twists, so I reluctantly took them out.

But something unexpected happened - I fell in love with my own bomb-ass twist out!!!! My hair was soft, hydrated, springy, coily and defined in a way that my twistouts generally aren't. 

What was different?  

When I twisted my hair I did it believing that I needed the twists to last at least a week.

- Although they were much larger than I do my twists when I plan to wear them for a month-plus, I still did between 25-30 twists.

- I did them fairly tightly - again because I thought they needed to last.

- I used 5 layers of product on my dry hair (Alikay's Dulce, and BBD's oil, Eden Bodywork's Coconut Shea Leave-in Conditioner, Shea Moisture's Curl Enhancing Smoothie and my mix (pretty much in that order))  instead of just one or two.

- I took my twists out after about 30 hours instead of my usual week (flat twists) or a month (small twists). It was enough time for the twists to dry and set, but not so much time that my hair was no longer moisturized.

- I also tried to be careful as I untwisted. I used a little oil on my hands, and didn't separate the strands very much.

Day 3 - and I still love it.
UPDATE

So it is now Day 5 of this twist-out and it is holding up much better than anticipated. I don't pineapple and I don't tie down my hair, so this has been maintained pretty much through my satin pillowcase and a retwist of 6 or so twists in the front on night 2 (with a little water) and the flat twists this morning (with a little water and a little olive oil). I expect that when I take out todays twists, the front will hang down and form a bob-like style.


Clockwise from the upper left Monday - Thursday, with today in the middle.
Yes I took most of these in my car studio & home of Jean Jacket Productions.

Tuesday, August 27, 2013

Today's Hair: August 27th


It was a New Day, New 'do kind of day. I had a messy bun yesterday that I shaped into something resembling a bow or Minnie Mouse ears - depending on who you ask, and I just didn't feel like walking around like that today. And I had some style inspiration - one of my co-workers had a a really pretty set of French braids, I have seen all kinds of braided bangs lately and there was a faux short hair cut I've seen that I fell in love with - if I find it again, I'll do a hair inspiration post on it...Anyway, I think all of that was on my mind when I came up with the style above.

1) I started by adding some oil and leave in conditioner to my stretched hair, and combing through the ends (they were a little tangled from my Bantus over the weekend).

2) I sectioned off a little more than 1/4 of my hair (a part from about the center of my head to over to my left ear, and from the center of my head toward my nose) to form a bang.

3) I combed through that section and did one large flat-twist across the front of the section toward my left ear and twisted the hanging ends. I took the hanging twist, brought the end toward the right side of my head, and pinned it into a circular bang. 

4) I took the rest of my hair, and flat twisted it from the right side of my head toward the left. When the twist reached just behind my left ear, I put the hair into a ponytail, and twisted the ends. 

5) I took the now single twist and pinned it into a circle also. 

Overall it took 5-6 minutes, but it looks nice, and it's a protective style that can last for several days to a week.   


Thursday, August 22, 2013

Hair Inspiration - Style Instructions

I try to gain hairspiration wherever I can find it, and I must say that when I saw this on Pintrest, I fell in love!
I haven't tried it yet, but I will...likely on stretched, lightly pressed, or even twisted hair. It should work with locs also. I imagine that the steps would include the following:


Image via viictoriiashea.tumblr.com

1. Separate the hair into three sections going across from the right to the left side of the head. Make the
middle section about half the size of the other two sections. You may wish to put the sections into ponytail holders until you are ready to work with the hair in that section.

2. Braid the front section toward the middle of the head, stopping at the part, and letting any excess hang. Add a ponytail holder, or pin the hair down, again allowing the excess hair to hang.

3. Braid the back section from the base of the neck toward the middle of the head, again stopping at the part and adding a pin or ponytail holder and allowing the excess hair to hang.

4. Finally form a bun with the middle section of hair, and incorporating the excess hair from the front and back sections. If the bun is not as full as you desire, feel free to add hair into your bun, and use your hair to cover the addition.

Do you think you'll try it?


Tuesday, June 25, 2013

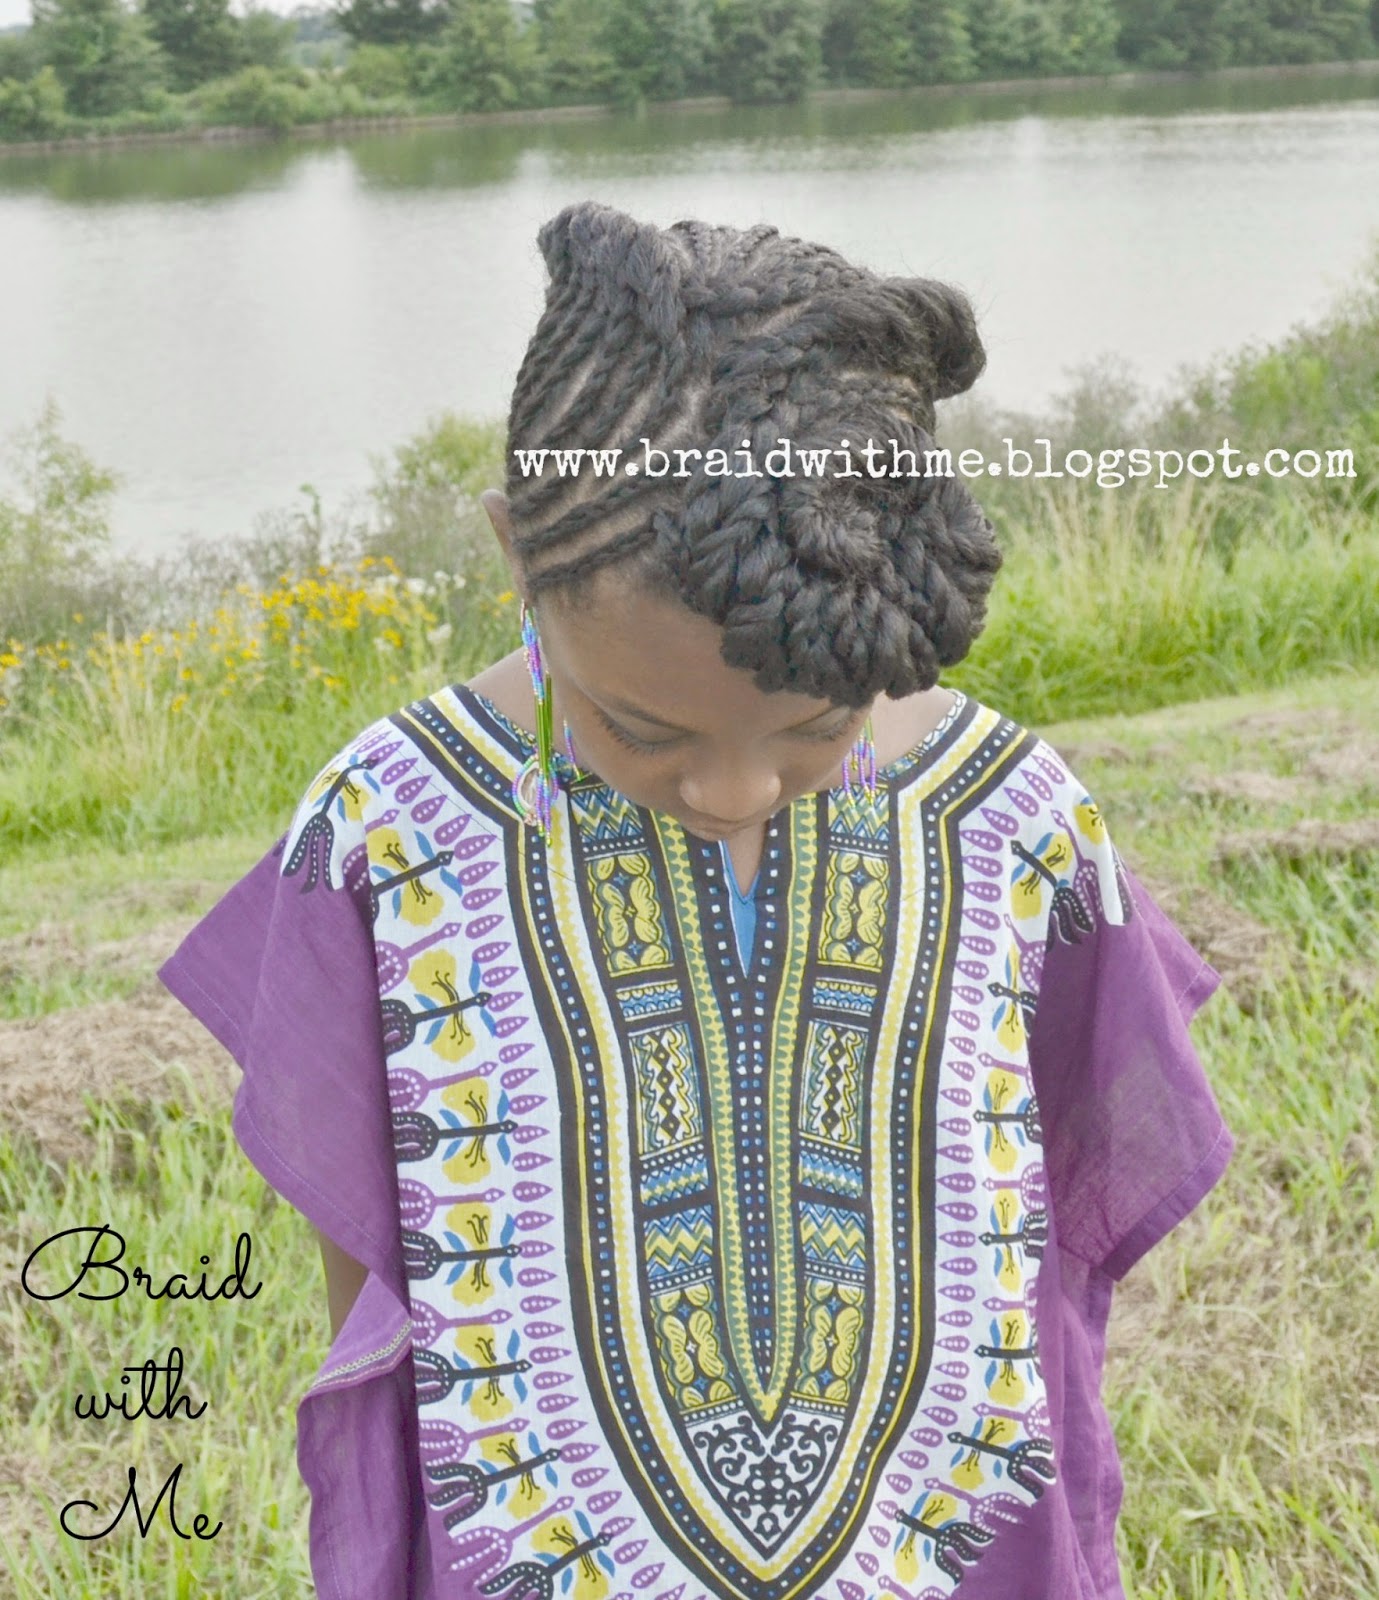
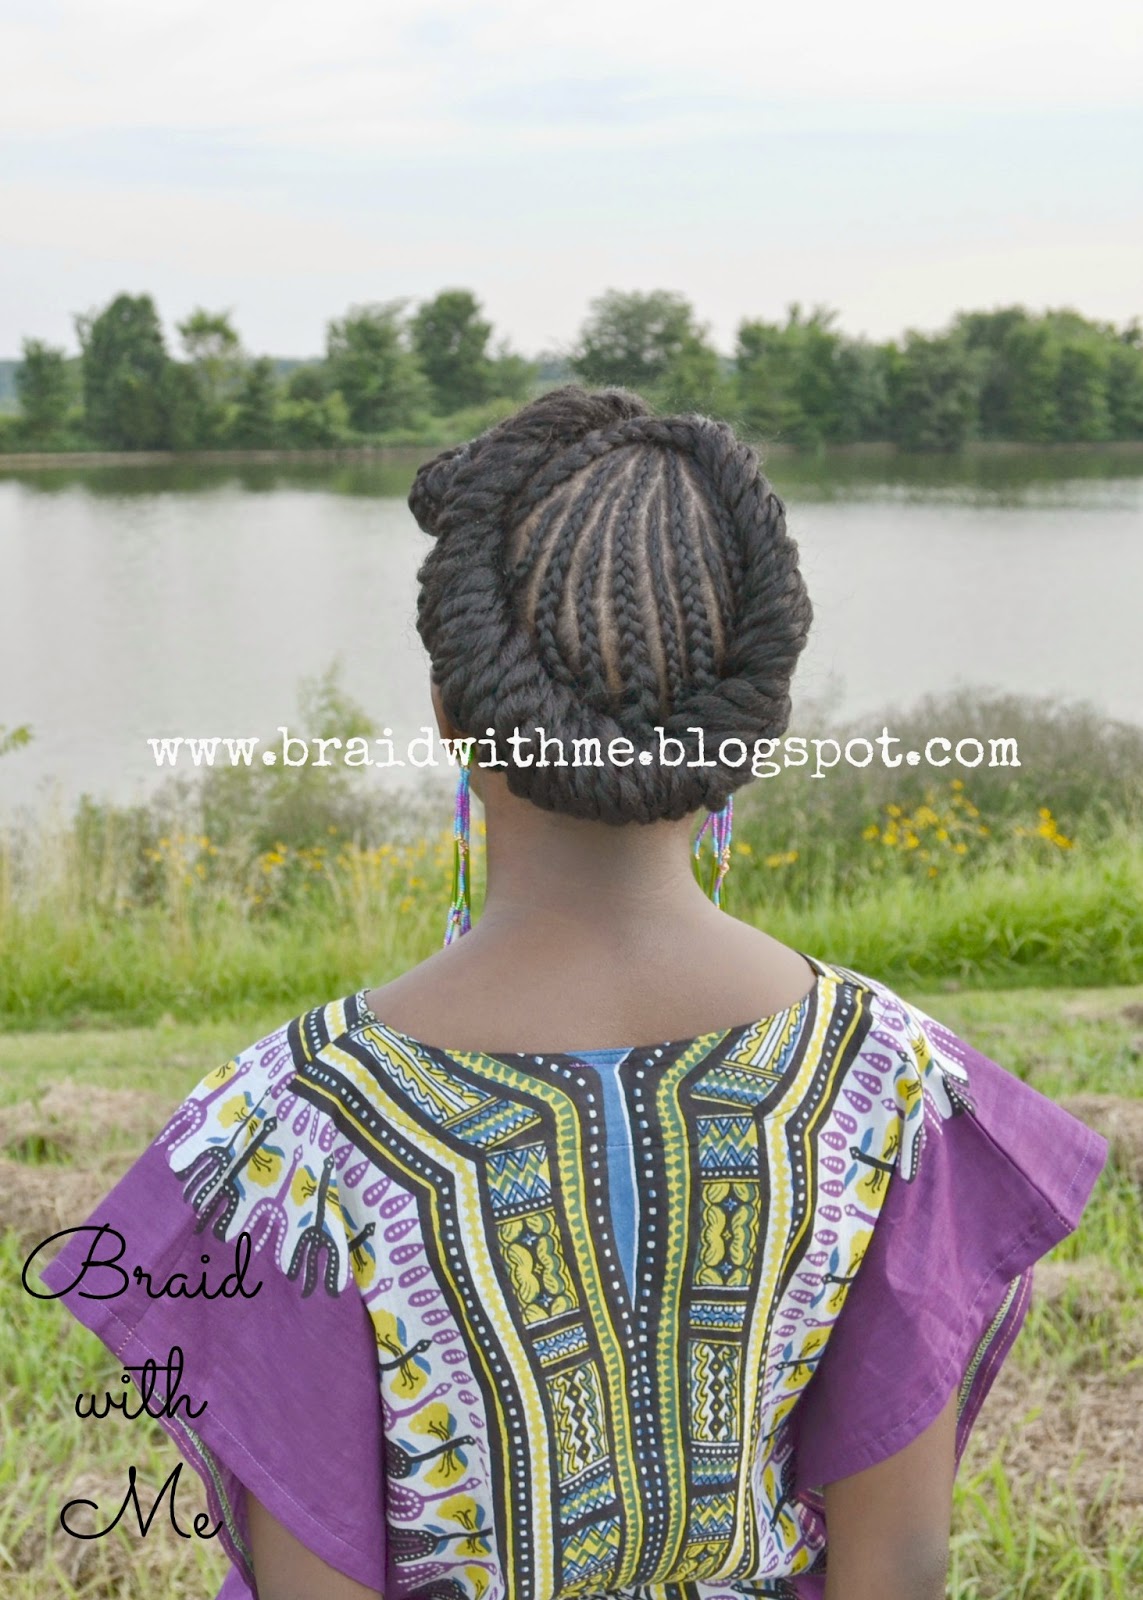
A Natural Updo: Rolled , Twisted and Pinned

By Aisha of Braid with Me

We're back with yet another natural updo! I created this style with a mixture of cornrows and two-strand twists. 


 The Style


The Dashiki

This beautiful dashiki was made by Charmaine of Tambo Collection. Charmaine was very helpful and prompt in answering all of my questions about our order. Our items arrived on time and in excellent condition. 

The following description is found on her Etsy page: 

Welcome to our world of African fabrics by the yard, and unique handmade clothing. "Tambo Collection" is North America's largest supplier for Kente and wax print fabrics. We also sell fat quarters for small projects. We ship fast, and if our item is not in stock we will notify you by email immediately. See our selection of our handmade premade head wraps and crowns. **We also have a selection of hard to find African ribbon and trimmings**


The dashiki can be worn as a dress or as a top. We also had the option of wearing it with or without the sash. Anisa absolutely loves her dashiki and as you can tell from the pictures, it fits her perfectly! If you are interested in purchasing one, the direct link will be provided below. 


Mtoto Nubienne Earcuffs for Little Girls

Did you notice the gorgeous little jewels gracing Anisa's ears? They are Mtoto Nubienne Earcuffs that were handmade by Ayida Honor. I first became acquainted with her special gift of jewelry design on her Etsy page, Native Style Beadery. She has since launched her own page, which can be found here

Upon one look at her handmade creations it is obvious that these items were made with love. Although the earcuffs that Anisa has were made for little girls, they are very durable. 

Be sure to check out her page, www.ayidahonor.com, and fall in love with her gift of intricate beadweaving techniques. 


We would love to hear from you! Be sure to leave comment below!