Showing posts with label flexi-rod set. Show all posts
Monday, March 11, 2013

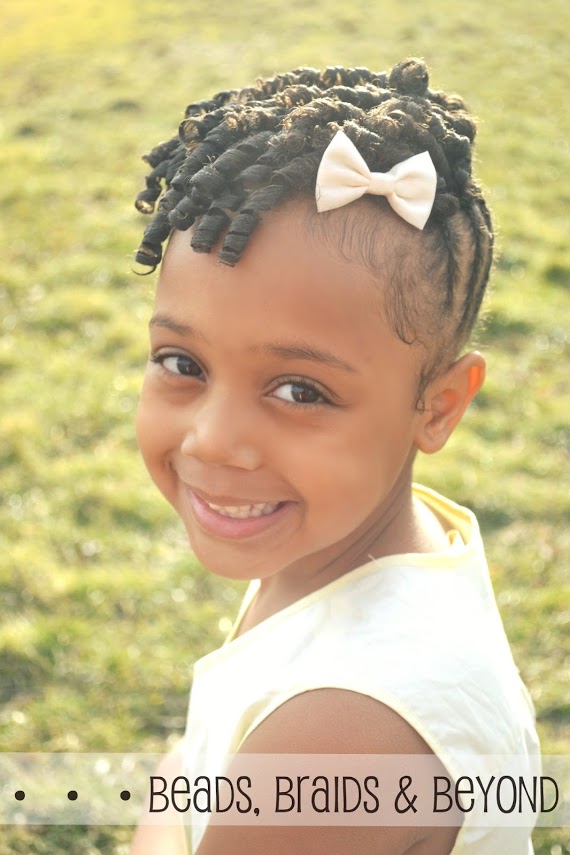
Little Girls Natural Hairstyle: Flexi-rod Updo with Cornrows

Miss A's cousin, Lil Bit!

This hair style is absolutely adorable for little girls (and big girls!) and perfect for any occasion!

Tools needed:
  • Ouchless bands (for banding)
  • A brush for detangling (I used Denman D4)
  • A comb for parting
  • Green 1/4" Flexi-rods (6 come in each pack, I believe I used 5 packs)
  • A few bobbypins 
  • Rubberbands
  • Products for styling
I used the following products:
  • Bee Mine Luscious Moisturizer
  • Bee Mine Curly Butter
  • Curls (for Target) Curl Control Paste
 (Use code: BBBSPRING for 10% off your Bee Mine Products Purchase!)

Helpful posts:

Instructions:
  •  I washed and detangled Lil Bit's hair. After washing I applied a generous amount of Bee Mine Luscious Moisturizer to her hair from root to tip and banded her hair in 3 sections to stretch it for styling. (see photo below)
Instagram picture. Follow us @beadsbraidsbeyond
  • I left the bands on for a few hours. I prefer keeping the bands in overnight however we did not have enough time so once I removed the bands her hair was stretched but slightly damp.
  • Using my comb, I parted a circle on the top of her head and tied it off. This section of hair is where I wanted the curls to be.
  • At the nape of her neck I began parting at a slight curve coming up to the top section of hair I had previously parted. I added a small amount of Bee Mine Curly Butter to each section I cornrowed and tied off each cornrow with a rubberband. 
  • Once all of her cornrows were in I grabbed the 1/4" green flexi-rods, applied an even amount of Curls Control Paste to 1 to 2 inch sections and rolled the flexi-rod on to the hair. Instead of bending the rods I simply put a hair tie on the ends to hold them in place. See picture below.

  • Her hair was already dry at this point so there was no heat involved. I never use heat when I use flexi-rods anyway which is why I use a product with good hold. I leave the flexi-rods in long enough for the curl to shape. I left these flexi-rods in for about an hour and a half while she played tea party with her cousins and sister.
  • After an hour and a half I gently rolled off each flexirod and used 3 bobby pins to pin any falling curls to the front. 
  • I added a small bow and viola! Beautiful!
Lil Bit absolutely loved her hair! She said she felt like she was in heaven and danced in front of the mirror for a good 30 minutes. Pleased indeed.


A few extras just in case you want to pin them on Pinterest!


Bonus! Stop by the blog later to see how I achieved Ky's twist out! (pictured below)


Let's connect!
 |Facebook | Pinterest | Instagram (@beadsbraidsbeyond) 
| Twitter (@beadsbraidsblog) | Youtube |

Looking forward to seeing you there! :)

Thursday, January 17, 2013

Little Girls Natural Hairstyle: Flexi-rod Set & Flat Twists on 4b Hair


I've been getting a lot of inquiries on how to do a flexi-rod set on 4b natural hair so I decided to try a super cute age appropriate style on Miss A's cousin, Ky! This hair style is adorable for any little girl and will work on every hair type!

Instructions:
  • I began by washing and detangling Ky's hair. I moisturized with Bee Mine Luscious Moisturizer and banded her hair overnight as I always do before doing flexi-rod sets. Click here for our Banding F.A.Q. post.
  • The next morning her hair was stretched enough to begin styling to I parted her hair from ear to ear and tied off the back section.
  • I parted a section of hair to begin creating the flat twists on the top. See pictures below to see how I do my flat twists.
How to flat twist natural hair:
Step 1: Part a section of hair. In the front of that section part off a small amount of hair and separate it into two pieces.

Step 2: With your two small pieces of hair, begin twisting each piece around the other. As you cross each section over, grab a tiny bit of hair off of the scalp. Keep your fingers as close to the scalp as possible. Continue until you reach the end of the flat twist.

Please note: I used Bee Mine Curly Butter on each flat twist.
  • After flat twisting the top section I began adding the flexi-rods. I decided to use CURLS (for Target) Control Paste on her particular hair type. I grabbed a flexi-rod and after applying a generous amount of the control paste to each 1-2 inch section of hair I began rolling the rod starting from the end of each section and working my way up. I made sure I firmly rolled her hair onto the rod to give it the desired curl I wanted. See pictures below.


Fold the remaining rod over


All done! I left the flexi-rods in for a little over 1 hair and gently removed them by unfolding and unrolling at the ends first, working my way up. I decided not to separate the curls and leave them as is.


Ky absolutely loved her hair! This was her first flexi-rod set and she was so excited to show it off. I feel so blessed to see the excitement on her face when she has a brand new hair style. Her mom typically does her hair in braids and beads so for her to be able to come to my house and with mom's permission rock an afro for the first time or a flexi-rod set is just amazing.

Again, if you're interested in using Bee Mine Products (we've been using them for years) don't forget we have a reader discount code for 10% off your purchase! The code is BBBSPRING and you can only use it at www.beemineproducts.com If anything, I highly recommend their luscious moisturizer! My personal fav.

I look forward to bringing you more hairstyles on different hair types. If you like this post please feel free to share on Facebook, Pinterest or any of your favorite social media websites.

I have been seeing so many amazing hairstyles on there lately and I really want to start doing "Facebook Shout Outs" here on the blog again so make sure you post your pictures!